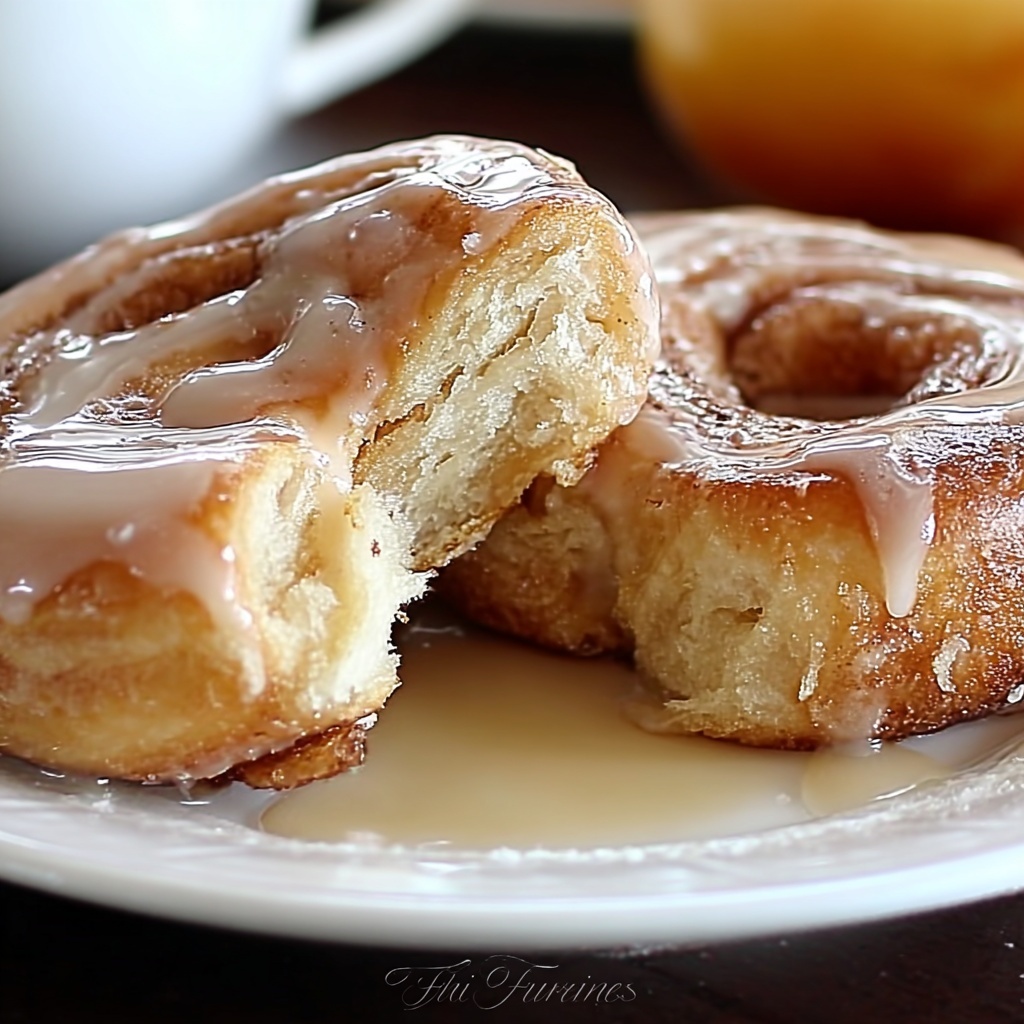
If you’re craving a sweet, tender treat that tastes like a warm hug baked right into dough, you simply must try this Homemade Honey Buns Recipe. These golden, cinnamon-swirled delights are soft on the inside with a perfectly crisp exterior, all enhanced by a luscious honey glaze that’s just divine. Whether you’re looking for a weekend breakfast indulgence or a cozy snack to share with friends, these honey buns bring a comforting homemade magic to your kitchen that’s hard to beat.
Ingredients You’ll Need
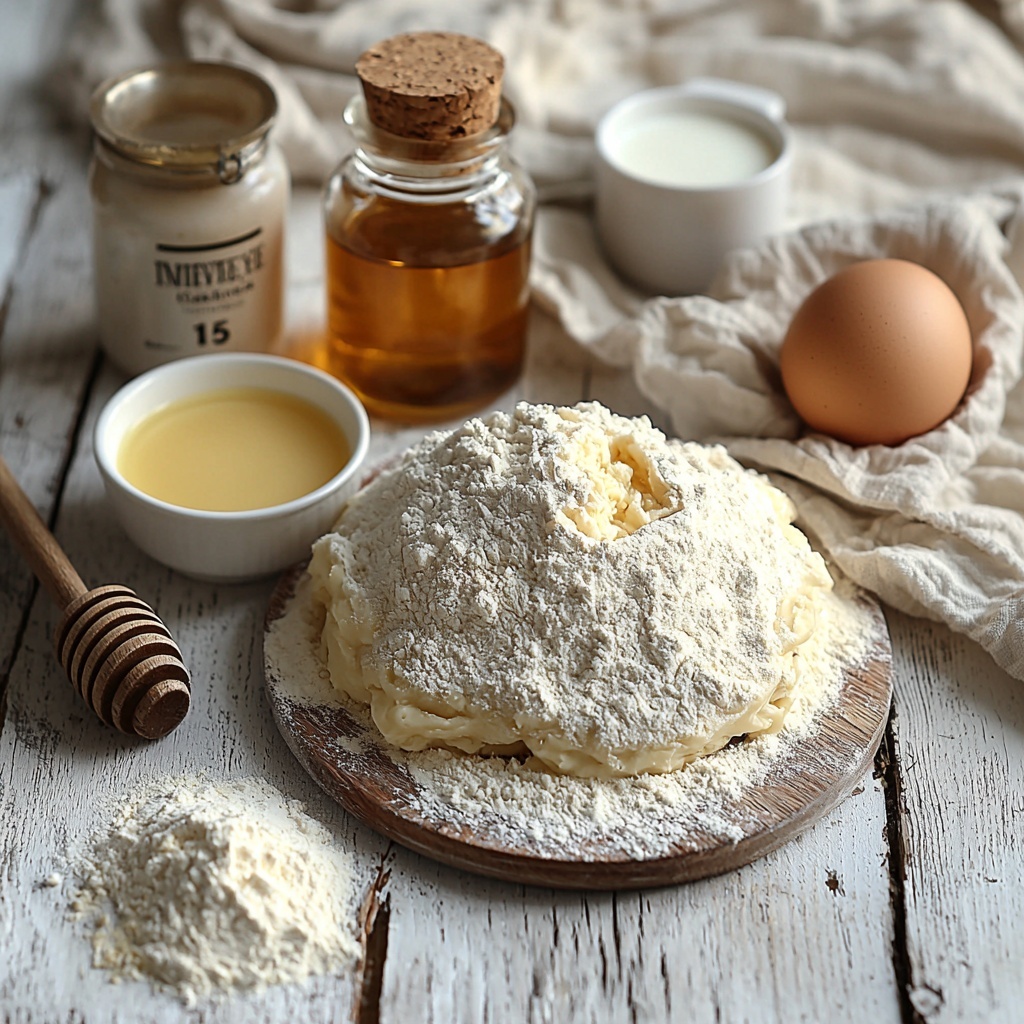
The magic of this Homemade Honey Buns Recipe lies in its simple, everyday ingredients, each playing a crucial role. From the creamy whole milk that gives tenderness to the dough, to the subtle sweetness of vanilla and honey that elevates every bite, these ingredients create harmony for a soft texture and rich flavor.
- 2¼ cups all-purpose flour: The sturdy base of the dough that gives it structure and softness.
- ¼ cup sugar: Adds the perfect kiss of sweetness to complement the honey glaze.
- ½ tsp salt: Balances flavor and enhances the sweetness and yeast activity.
- ⅔ cup whole milk: Provides moisture and contributes to the dough’s tender crumb.
- 1 packet instant yeast: The powerhouse ingredient that helps the dough rise beautifully.
- ⅓ cup butter (melted, cooled): Adds richness and a soft bite to the dough.
- 1 large egg: Binds the dough and enriches the flavor.
- 2 tsp vanilla extract: Infuses the dough with a warm, fragrant note.
- 2-2½ cups vegetable oil (for frying): Creates a golden, crispy crust on each bun.
- 3 tbsp butter (melted) for glaze: Makes the glaze silky and luscious.
- 1¼ cup powdered sugar (sifted) for glaze: The sweet backbone of the glaze that perfectly coats the buns.
- 2 tbsp milk for glaze: Thins the glaze to a drizzle-able consistency.
- 2 tsp honey for glaze: Adds a natural sweetness and depth of flavor.
- ½ tsp vanilla extract for glaze: Rounds out the glaze with a lovely aromatic touch.
How to Make Homemade Honey Buns Recipe
Step 1: Prepare the Dough
Begin by mixing the dry ingredients—flour, sugar, salt, and instant yeast—in a large bowl. In a separate bowl, whisk together the warmth of milk, melted butter, egg, and vanilla extract, which together create a luxurious base for the dough. Combine these wet and dry components to form a soft, slightly sticky dough that’s ready for kneading.
Step 2: Knead and Rise
Turn your dough onto a floured surface and knead it for about 5 minutes until it’s smooth and elastic—this process builds the dough’s strength so it can rise beautifully. Transfer the dough to a greased bowl and cover it with plastic wrap. Let it rest in a warm, cozy spot for roughly 90 minutes until it doubles in size, making the dough light and airy.
Step 3: Shape the Buns
Once risen, punch down the dough gently to release excess air. Roll it out into a rectangle about half an inch thick, then brush the surface generously with melted butter and sprinkle with cinnamon for that classic spiced swirl. Roll up the dough tightly into a log, slicing it into 14 even pieces—these are your soon-to-be golden honey buns.
Step 4: Fry to Perfection
Heat the vegetable oil in a frying pan over medium heat until it reaches around 350°F. Carefully fry each bun slice, cooking for 2 to 3 minutes on each side until the outsides turn a gorgeous golden brown. Drain the fried buns on paper towels to absorb any excess oil and keep that perfect crispness.
Step 5: Glaze and Enjoy
While the buns are still warm, whisk together the powdered sugar, milk, honey, vanilla, and melted butter to make a luscious glaze. Drizzle this over the buns generously, letting it soak in and add that irresistible sticky sweetness that complements the cinnamon and dough. Now they’re ready to be devoured!
How to Serve Homemade Honey Buns Recipe
Garnishes
Enhance your honey buns with a sprinkle of chopped pecans or walnuts for a delightful crunch, or dust a little extra cinnamon sugar on top for an eye-catching finish. Fresh berries or a dollop of whipped cream make beautiful, tasty accents that take presentation and flavor up a notch.
Side Dishes
Pair your honey buns with a steaming cup of coffee or a spiced chai latte for a cozy morning ritual. Fresh fruit salad or a citrusy yogurt parfait can add brightness and balance the rich sweetness of the buns, rounding out your meal perfectly.
Creative Ways to Present
Serve these honey buns on a rustic wooden board for a charming farmhouse vibe or arrange them in a spiral atop a cake stand to impress guests. For a fun twist, try creating mini honey bun sliders with cream cheese and smoked ham—a surprising and scrumptious savory-sweet delight.
Make Ahead and Storage
Storing Leftovers
If you somehow have leftover honey buns (though unlikely!), store them in an airtight container at room temperature for up to 2 days. This keeps them soft and fresh, ready for a quick sweet fix any time.
Freezing
For longer storage, wrap individual buns tightly in plastic wrap and place them in a freezer-safe bag. Frozen honey buns keep beautifully for up to 2 months. Simply thaw overnight in the fridge or at room temperature before enjoying.
Reheating
Reheat your honey buns gently in the microwave for 15 to 20 seconds or warm them in a preheated oven at 325°F for about 5 minutes. This revives their soft, fluffy texture and melts the glaze slightly, making them taste freshly made.
FAQs
Can I use bread flour instead of all-purpose flour?
Absolutely! Bread flour can give your honey buns a chewier texture because of its higher protein content. It’s a nice option if you prefer your buns a bit more substantial, but all-purpose flour works perfectly for a soft and tender result.
Is it possible to bake the honey buns instead of frying?
Yes, you can bake these buns. Place the sliced buns on a parchment-lined baking sheet and bake at 375°F for about 15 to 18 minutes until golden. The texture will be less crispy on the outside but still deliciously soft and fluffy.
How do I know when the oil is ready for frying?
Oil at around 350°F is perfect for frying your honey buns. You can test this by dropping a small piece of dough into the oil—it should bubble and float to the top quickly without burning. Using a kitchen thermometer is the most reliable method.
Can I substitute honey with maple syrup in the glaze?
Certainly! Maple syrup makes a lovely alternative in the glaze, lending a slightly different but equally delicious flavor. Just keep the quantity the same and enjoy that rich sweetness.
Why is my dough not rising as expected?
If your dough isn’t rising well, it might be due to inactive yeast or a chilly environment. Make sure your yeast is fresh and that the dough rests in a warm spot, ideally around 75-80°F. Sometimes giving the dough a bit more time can work wonders, too.
Final Thoughts
Making your own Homemade Honey Buns Recipe is like bringing a slice of bakery magic right into your kitchen. These buns truly shine with their soft, airy texture, warm cinnamon swirl, and that irresistible honey glaze. Whether you’re sharing them with loved ones or sneaking in a quiet moment alone, they’re a delicious reminder of the simple joys of homemade baking. Give them a try—you might just find your new favorite sweet treat!
Print
Homemade Honey Buns Recipe
- Prep Time: 20 minutes
- Cook Time: 20 minutes
- Total Time: 1 hour 50 minutes
- Yield: 14 servings
- Category: Dessert
- Method: Frying
- Cuisine: American
Description
These homemade honey buns are soft, fluffy, and perfectly sweetened with a delicate honey glaze. Made from scratch with a simple yeast dough, they are fried to a golden brown and topped with a luscious glaze, making them an irresistible treat for breakfast or dessert.
Ingredients
Dough Ingredients
- 2¼ cups all-purpose flour
- ¼ cup sugar
- ½ tsp salt
- ⅔ cup whole milk
- 1 packet instant yeast (about 2¼ tsp)
- ⅓ cup butter, melted and cooled
- 1 large egg
- 2 tsp vanilla extract
Frying
- 2–2½ cups vegetable oil (for frying)
Glaze Ingredients
- 3 tbsp butter, melted
- 1¼ cup powdered sugar, sifted
- 2 tbsp milk
- 2 tsp honey
- ½ tsp vanilla extract
Instructions
- Prepare the Dough: In a large bowl, combine the all-purpose flour, sugar, salt, and instant yeast. In a separate bowl, whisk together the whole milk, melted and cooled butter, egg, and vanilla extract. Pour the wet ingredients into the dry ingredients and mix until a soft dough forms.
- Knead and Let Rise: Turn the dough out onto a floured surface and knead for about 5 minutes until it becomes smooth and elastic. Place the dough in a greased bowl, cover it with plastic wrap, and let it rise in a warm place for approximately 90 minutes or until it has doubled in size.
- Shape the Buns: Punch down the risen dough and roll it into a rectangle about ½ inch thick. Brush the surface with melted butter and sprinkle with cinnamon (amount not specified but typically about 1-2 tsp). Roll the dough tightly into a log and cut into 14 equal pieces.
- Fry the Buns: Heat vegetable oil in a frying pan over medium heat to about 350°F (175°C). Carefully fry each bun piece until golden brown on both sides, roughly 2-3 minutes per side. Remove from the oil and drain on paper towels to remove excess oil.
- Make the Glaze and Serve: In a small bowl, mix the sifted powdered sugar, milk, honey, and vanilla extract until smooth. Drizzle this honey glaze over the warm buns and serve immediately for the best flavor and texture.
Notes
- Ensure the oil temperature is maintained around 350°F to avoid greasy buns or burning.
- Kneading the dough sufficiently is key to achieving a soft and fluffy texture.
- You can store leftover buns in an airtight container and reheat gently before serving.
- For a cinnamon sprinkle, about 1-2 teaspoons added before rolling enhances flavor.
- These buns are best enjoyed fresh but can be frozen before frying for later use.
