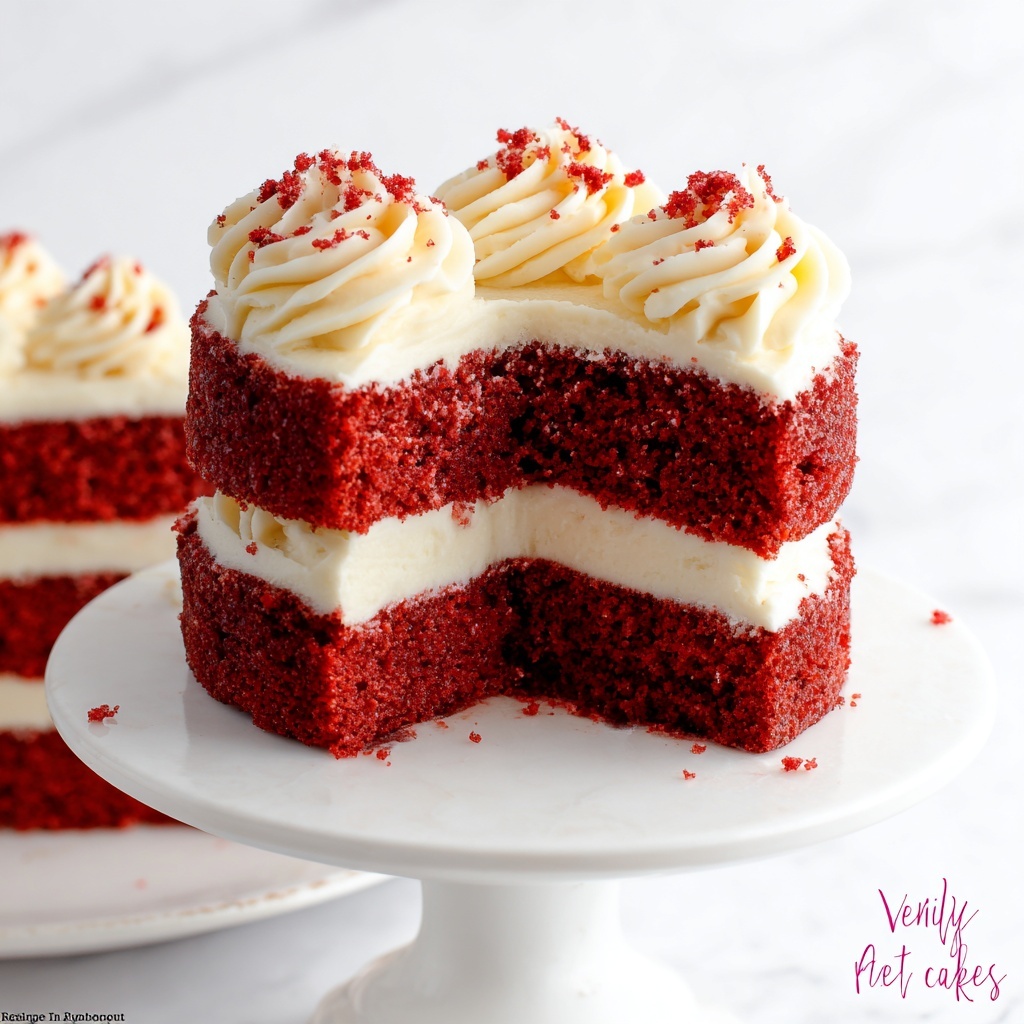
If you’ve ever wanted to impress your friends or family with an irresistible bite-sized treat, this Easy Mini Red Velvet Cakes Recipe is your new best friend. Packed with that classic rich, velvety flavor and topped with luscious cream cheese frosting, these tiny layered cakes are not only adorable but downright delicious. Perfect for parties, special occasions, or whenever you need a little red velvet happiness in a petite package, this recipe brings together straightforward ingredients and simple steps to create something truly delightful. You’ll love how these mini cakes deliver the perfect balance of sweetness, texture, and charm every single time.
Ingredients You’ll Need
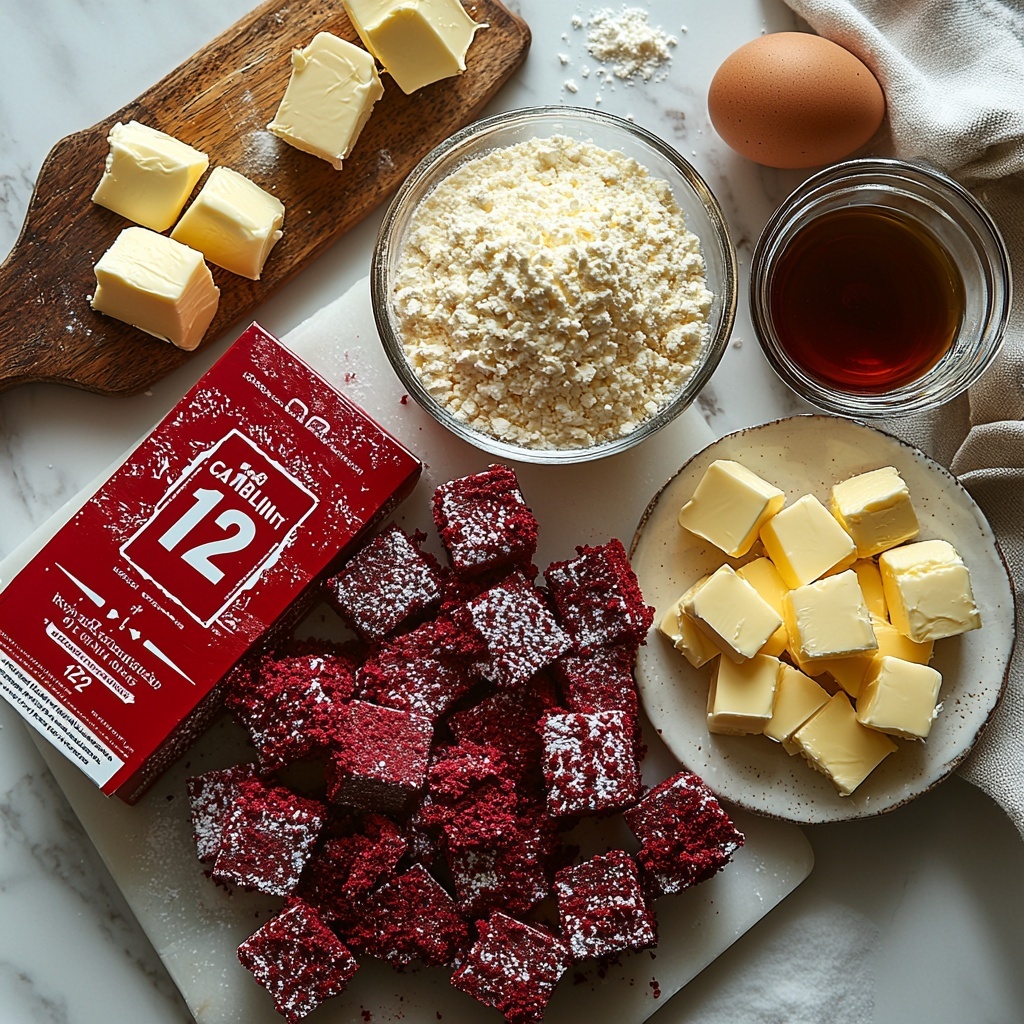
The magic of this Easy Mini Red Velvet Cakes Recipe lies in its approachable pantry essentials that come together for a show-stopping result. Every ingredient plays a crucial role, from providing the moist crumb to the creamy frosting that wraps around each bite.
- 1 box red velvet cake mix: The base of the cake brings that iconic red hue and tender crumb.
- 1 1/4 cups water: Adds moisture to keep the cakes soft and fluffy.
- 1/3 cup butter (melted): Enhances richness and lends a velvety texture.
- 3 eggs: Provide structure and help the cake rise perfectly.
- 16 oz cream cheese (softened): Gives the frosting the signature tangy creaminess.
- 2 sticks unsalted butter (softened and cut into 1/2″ cubes): Contributes smoothness and body to the frosting.
- 3 cups powdered sugar: Sweetens and thickens the frosting for piping.
- 2 tsp vanilla: Enhances overall flavor with a subtle warmth.
How to Make Easy Mini Red Velvet Cakes Recipe
Step 1: Bake the Cupcakes
Start by preparing the cupcakes according to the directions on your red velvet cake mix box. Combine the water, melted butter, and eggs with the mix, then bake until a toothpick inserted into the center comes out clean. This step ensures you get moist, tender cupcakes that form the perfect foundation for your mini cakes.
Step 2: Cool the Cupcakes
As soon as they’re baked, gently turn the cupcakes out onto a clean surface to cool completely. This cooling step is essential because frosting warm cupcakes can turn into a melty mess, and you want those layers to stack neatly without slipping around.
Step 3: Make the Cream Cheese Frosting
While your cupcakes cool, whip up that dreamy cream cheese frosting. Beat the softened cream cheese in a stand mixer until smooth and creamy. Gradually add the cubed butter, blending until the mixture is silky. Next, slowly add the powdered sugar in small increments for a fluffy, sweet texture. Finish by stirring in vanilla for that warm, inviting aroma. Transfer the frosting to a piping bag fitted with a Wilton 1M tip, or simply snip a small corner off a zip-top bag if you prefer. This frosting is the luscious glue that holds your mini cakes together.
Step 4: Assemble the Mini Cakes
Remove the cupcake wrappers, then carefully slice the domed tops off the cupcakes using a serrated knife. Don’t toss those tops—they’re perfect for cake pops or a sweet snack later! Slice each cupcake in half horizontally to create layers. Begin assembling by piping a layer of frosting onto the bottom half, add the middle cake layer, followed by more frosting, then the final cake layer, and a generous topping of frosting on top. You’re creating a three-tiered mini cake that’s as gorgeous as it is delicious.
Step 5: Garnish with Flair
To finish, sprinkle the tops with cake crumbs or vibrant red sprinkles for that perfect festive touch. These little accents not only make your cakes pop visually but also add a bit of texture and fun.
How to Serve Easy Mini Red Velvet Cakes Recipe
Garnishes
Garnishing your mini red velvet cakes elevates their charm and taste. Cake crumbs are an easy way to add a bit of rustic texture, while red sprinkles lend a festive sparkle that instantly makes your creation celebration-ready. You can also try edible glitter or tiny fresh berries for a fresh burst of elegance.
Side Dishes
These mini cakes pair wonderfully with light sides that complement their richness without overpowering them. Fresh fruit salad, like berries or citrus segments, offers a refreshing counterpoint. A simple scoop of vanilla ice cream alongside can also turn this treat into an indulgent dessert experience.
Creative Ways to Present
Presentation makes all the difference! Arrange your mini cakes on a tiered serving tray for an eye-catching dessert display, perfect for parties and gatherings. Placing each cake in a decorative paper liner or atop a small doily gives them a charming elegance. For a gift, stack them in a clear box tied with a ribbon—it’s a thoughtful homemade surprise anyone would cherish.
Make Ahead and Storage
Storing Leftovers
If you have leftovers, keep your mini red velvet cakes fresh by storing them in an airtight container in the refrigerator. This will preserve the texture and flavor for up to 3 days. Just make sure to bring them to room temperature before serving for the best taste.
Freezing
These mini cakes freeze beautifully! Wrap each cake individually in plastic wrap and place them in a freezer-safe container or bag. They will keep well for up to 2 months. When you’re ready to enjoy, thaw them overnight in the refrigerator, then allow them to warm slightly before serving.
Reheating
Reheating mini red velvet cakes is simple—just let them come to room temperature or warm very gently in the microwave for 10-15 seconds. Avoid overheating, as it could melt the cream cheese frosting and affect the texture.
FAQs
Can I use homemade red velvet cake instead of a mix?
Absolutely! While this Easy Mini Red Velvet Cakes Recipe uses a boxed mix for convenience, homemade red velvet cake will work beautifully too. Just make sure the batter is smooth and the texture is moist to achieve the best layer stacking.
What if I don’t have a piping bag or piping tip?
No worries at all! Simply fill a resealable plastic bag with the frosting and cut off a tiny corner to pipe the frosting. It’s an easy hack that still gives you nice control over spreading and layering.
How do I prevent the mini cakes from sliding apart?
The key is to use enough frosting between layers as a glue and to chill the cakes briefly once assembled. This helps the frosting set and keeps everything stable when you handle or serve them.
Can I make these cakes vegan or dairy-free?
With some ingredient swaps, yes! Use a dairy-free cream cheese and butter alternative, and pick a vegan red velvet cake mix or make one from scratch. The texture might differ slightly, but the flavor can still be wonderfully close to the original.
What are the best occasions to serve these mini cakes?
These delightful Easy Mini Red Velvet Cakes are perfect for birthdays, bridal showers, holiday parties, or just a sweet treat whenever you want to brighten someone’s day with a pop of red velvet joy!
Final Thoughts
There’s something undeniably joyful about sinking your teeth into a perfectly layered, fluffy mini cake with that smooth cream cheese frosting melting on your tongue. This Easy Mini Red Velvet Cakes Recipe brings that happiness right to your kitchen in a fun and approachable way. Whether you’re making them for a special event or just because, I promise these little cakes will become a cherished favorite. So grab your mixing bowl, preheat that oven, and get ready to bake up some smiles!
Print
Easy Mini Red Velvet Cakes Recipe
- Prep Time: 5 minutes
- Cook Time: 25-30 minutes
- Total Time: 35-40 minutes (excluding cooling and assembly time)
- Yield: 10 mini red velvet cakes
- Category: Dessert
- Method: Baking
- Cuisine: American
Description
These Easy Mini Red Velvet Cakes are delightful, multi-layered treats made using a simple box mix and a creamy homemade cream cheese frosting. Perfectly sized for parties or as a sweet indulgence, these mini cakes combine moist red velvet layers with rich, smooth frosting, topped with festive red sprinkles or cake crumbs.
Ingredients
For the Cake:
- 1 box red velvet cake mix
- 1 1/4 cups water
- 1/3 cup butter (melted)
- 3 eggs
For the Frosting:
- 16 oz cream cheese (softened)
- 2 sticks unsalted butter (softened and cut into 1/2″ cubes)
- 3 cups powdered sugar
- 2 tsp vanilla extract
Instructions
- Bake the Cupcakes: Prepare the cupcakes according to the box directions, mixing the red velvet cake mix with water, melted butter, and eggs as specified. Pour the batter into a muffin tin lined with cupcake liners and bake until a toothpick inserted in the center comes out clean, about 25-30 minutes.
- Cool the Cupcakes: Immediately after baking, turn the cupcakes onto a clean surface to cool completely. This ensures they firm up and are easier to assemble and frost without falling apart.
- Prepare the Frosting: In a stand mixer, beat the softened cream cheese until creamy. Gradually add the softened butter cubes, beating until fully combined and smooth. Add powdered sugar half a cup at a time, mixing thoroughly after each addition for a smooth and well-incorporated frosting. Stir in vanilla extract. Transfer the frosting to a pastry bag fitted with a Wilton 1M piping tip or a zip-top bag with a corner snipped off for piping.
- Assemble the Mini Cakes: Remove the cupcake wrappers carefully. Using a serrated knife, cut the top off each cupcake and reserve for another use. Then slice each cupcake horizontally into three thin layers. Pipe frosting between each layer to build a three-tiered mini cake, finishing with frosting on the top layer.
- Garnish: Decorate the tops of assembled mini cakes with cake crumbs saved from the tops or with red sprinkles for a festive look.
Notes
- You can save the trimmed cupcake tops for cake pops, snacking, or adding texture as garnish.
- Ensure all frosting ingredients are softened to room temperature for a smooth mixture.
- Use a serrated knife to cut cupcakes cleanly and prevent crumbling.
- If you don’t have a piping tip, simply use a zip bag with a small corner cut for frosting application.
- Store assembled mini cakes in an airtight container in the refrigerator for up to 3 days.

