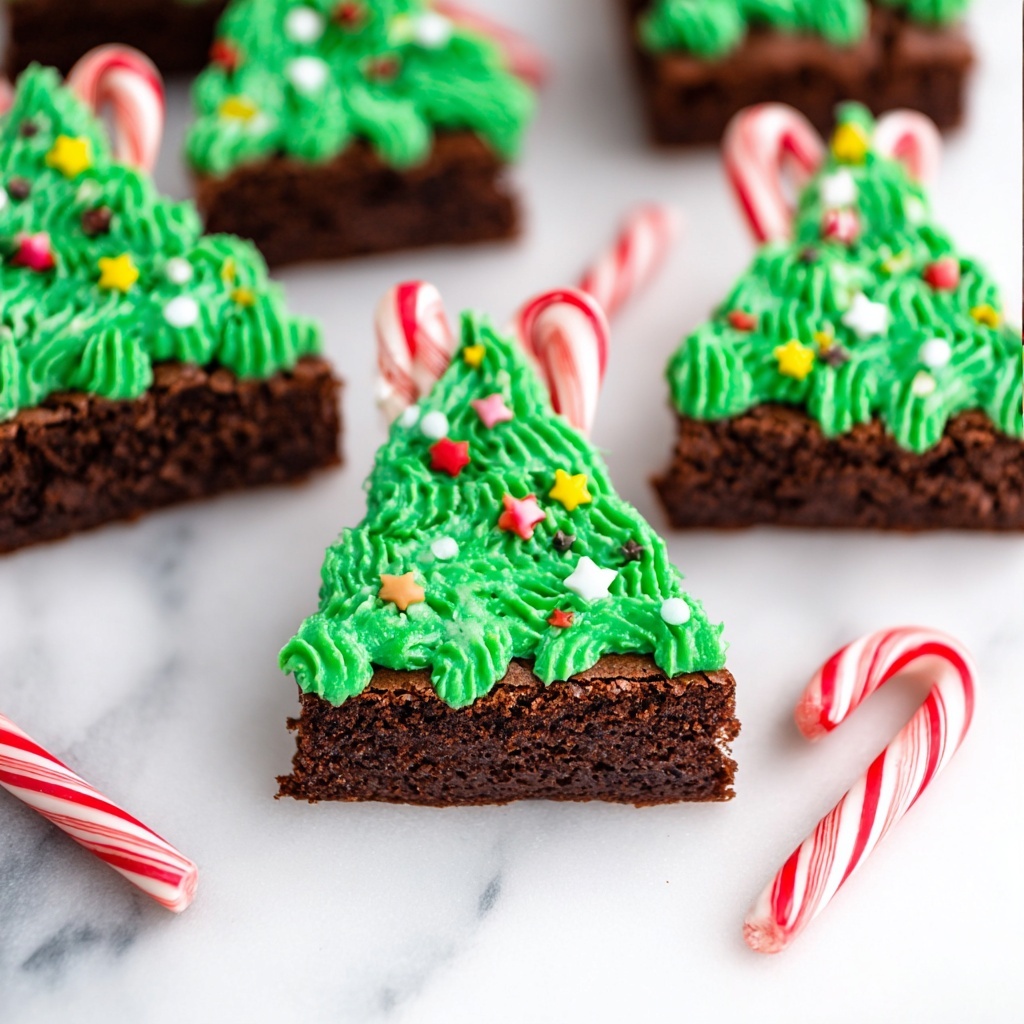
If you want a festive treat that’s not only scrumptious but a total crowd-pleaser, this Christmas Tree Brownies Recipe is your new best friend. Imagine fudgy, deeply chocolatey brownies transformed into adorable little evergreen trees, all dressed up with vibrant green frosting, sparkly sprinkles, and a mini candy cane trunk. It’s the perfect festive dessert to share at holiday parties or cozy nights in, and I can promise you’ll find yourself making these year after year.

Ingredients You’ll Need
These ingredients are straightforward yet play a vital role in creating the perfect balance of moist brownies, velvety frosting, and that festive pop of color and texture. Each one is essential to bring this Christmas Tree Brownies Recipe to life.
- Boxed Brownie Mix: The base of our brownies, providing rich chocolate flavor and an easy shortcut to homemade magic.
- Extra Egg Yolk: Adds extra moisture and richness to make the brownies extra fudgy.
- White Frosting: This forms the canvas for our green “tree” icing and holds our decorations in place.
- Green Food Coloring: For that unmistakable Christmas tree shade that sparks holiday joy.
- Christmas Sprinkles: Tiny bursts of festive color and crunch that bring the trees to life.
- Mini Candy Canes: Tiny edible trunks that complete the Christmas tree look with a sweet twist.
How to Make Christmas Tree Brownies Recipe
Step 1: Preheat Your Oven
Start by setting your oven to the temperature recommended on your brownie mix box. This ensures that your brownies will bake evenly and come out perfectly fudgy every time—no surprises here!
Step 2: Prepare the Pan
Line a 9×9-inch baking pan with parchment paper, making sure to leave extra overhang on the sides. This little trick makes it much easier to lift the entire batch of brownies out once they’re cooled, keeping our festive shapes intact.
Step 3: Mix the Batter
Whisk together the brownie mix ingredients listed on the box plus one extra egg yolk. The goal here is to combine everything just until the flour disappears—no over-mixing, which keeps the texture tender. If whisking feels tricky, a spatula works wonders too.
Step 4: Bake Your Brownies
Pour the batter into your prepared pan and bake it right on the middle rack of your oven following the box directions. The middle rack is the sweet spot for even heat distribution, ensuring no burnt edges or undercooked centers.
Step 5: Check for Doneness
A few minutes before the minimum baking time, start checking with a toothpick. The ideal brownie is a bit gooey inside with only a few streaks of batter clinging to the toothpick—this means fudgy, not dry. If it’s not quite ready, pop it back in and test every couple of minutes.
Step 6: Cool and Color the Frosting
After baking, leave the brownies in the pan to cool briefly, then move the pan to the fridge. While they cool, mix your white frosting with green food coloring until you hit that perfect Christmas tree shade. Bright and cheerful is the way to go!
Step 7: Trim and Chill
Once cooled, carefully lift the brownies out using your parchment overhang and trim off the edges. Don’t rush to cut them until completely cooled—or if still warm, chill again. This prevents crumbling and keeps those tree shapes neat.
Step 8: Cut the Brownies into Trees
You can decide the size of your Christmas tree brownies here! For smaller trees (about 18), cut the slab into three long strips, then slice those into three squares each, and finally cut each square diagonally into triangles. For bigger trees (about 8), cut the slab in half lengthwise and slice each half into four triangles in a zig-zag pattern, trimming edges slightly for sharper shapes.
Step 9: Decorate Your Christmas Tree Brownies Recipe
Now for the fun part! Pipe or spread your green frosting over each triangle, sprinkle them with festive Christmas sprinkles, and finish with a mini candy cane at the base to serve as the tree trunk. Instant holiday charm!
Step 10: Enjoy and Share
These adorable treats are ready to party! Serve them at your holiday gatherings or gift them wrapped up in festive boxes—the perfect homemade delight with a sprinkle of Christmas magic.
How to Serve Christmas Tree Brownies Recipe

Garnishes
Besides the classic sprinkles and candy cane trunks, consider adding edible glitter for a frosty sparkle or tiny edible silver balls to mimic ornaments. Fresh mint leaves placed underneath can add a refreshing touch and a burst of green.
Side Dishes
Pair these brownies with a scoop of peppermint ice cream or a dollop of whipped cream spiked with a splash of vanilla for an extra indulgent celebration. A hot cup of cocoa or spiced mulled wine also complements their rich texture and festive flavors beautifully.
Creative Ways to Present
Arrange the brownies on a large platter shaped like a bigger Christmas tree, or place them individually in mini cupcake liners decorated with red and white ribbon for gift-giving. For kids, turning the decorating into a DIY activity with extra toppings makes the experience unforgettable.
Make Ahead and Storage
Storing Leftovers
Wrap your Christmas Tree Brownies Recipe tightly in plastic wrap or store in an airtight container at room temperature for up to three days. Keeping them sealed preserves that fudgy texture and keeps the frosting looking fresh.
Freezing
You can freeze the uncut brownie slab before decorating by wrapping it well with foil and plastic wrap. Freeze for up to two months. When ready to use, thaw in the fridge overnight before cutting and frosting for best results.
Reheating
Brownies taste fantastic slightly warmed. Just pop a single tree piece in the microwave for about 10-15 seconds to bring out that gooey, indulgent center. Avoid overheating to keep the frosting intact and delicious.
FAQs
Can I make this recipe from scratch instead of using boxed mix?
Absolutely! Using a homemade brownie recipe with rich cocoa and butter will deepen the flavor even more. Just make sure the batter is not too runny so your brownies hold their shape well for cutting.
What can I substitute for green food coloring?
If you prefer natural options, try matcha powder mixed into white frosting for a subtle green hue and a hint of earthy flavor. Spinach juice is another natural choice but can alter the taste slightly.
How long do the decorated brownies last?
Once frosted and decorated, these brownies are best enjoyed within two to three days to ensure freshness and avoid drying out, especially if kept at room temperature.
Can I use other candy for the tree trunks?
Definitely! Pretzel sticks or chocolate-dipped cookie sticks work wonderfully as tree trunks and add a nice crunch twist for those who want to get creative.
Is there a way to make this gluten-free?
Yes! Use a gluten-free brownie mix or your favorite gluten-free recipe. The decorating steps remain exactly the same, so you’ll still get that festive look and delicious taste.
Final Thoughts
There’s something truly joyful about turning a classic brownie into a festive Christmas tree that brings smiles all around. This Christmas Tree Brownies Recipe is easy, fun, and downright delicious—perfect for holiday baking with family and friends. Trust me, once you try it, it will become a beloved seasonal tradition you’ll look forward to each year. So preheat that oven and let’s get baking!